If you, being a gamer who loves to play games on PC, you know the importance of a good GPU. The better the GPU, the better your games will perform. But, some games don’t use GPU; those games are either super old or super basic.
But then there are games like Minecraft Not Using GPU because it just doesn’t require it. You can make your game use a graphics card with certain settings. I can help you solve Minecraft’s issue of not using GPU because it is not that big of an issue.
So let’s get started with our guide.
Minecraft Not Using GPU? How To Make Minecraft Use GPU?
Several methods can help you make your game use GPU. But, I will discuss the easiest and the most effective solutions for your ease. All you have to do is follow the instructions I mention in proper sequence, and soon you will be able to make your Minecraft use GPU while running.
#1- Use The NVIDIA GPU For Minecraft
The first way is to use the control panel of NVIDIA if your Minecraft not using full GPU. Here are the steps:
- On your desktop, right-click to open the menu, and from there, select ‘NVIDIA Control Panel’
- Now go to ‘Manage 3D Setting’, go to the label and chose the ‘High-performance NVIDIA processor’ from the available menu.
- Go to the ‘Program Settings’ label and specifically allow NVIDIA GPU for Minecraft and then ‘Add’ it.
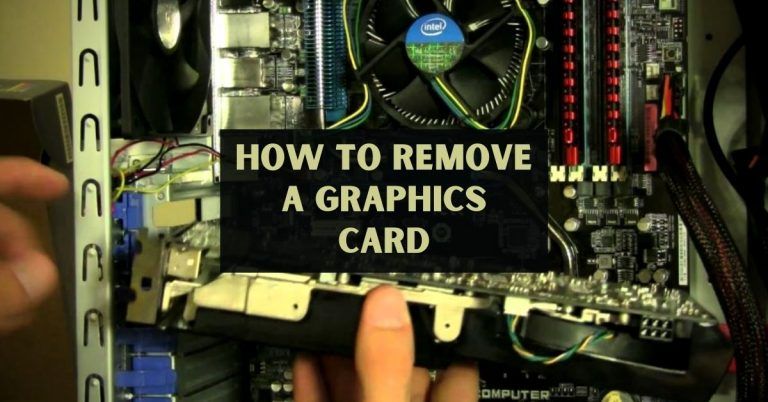
- Now go to ‘Browse’ on the add tab, open your game’s folder in it, and locate the Minecraft bin folder, which (most probably) will be in ‘Drive C: (Program Files) (x86)Minecraftruntimejre-x641.8.0_25bin.
- You will see ‘Javaw.exe’, select it and open it from the bin section, locate the drop-down menu, chose the ‘preferred graphics card for this program’, and finally select the ‘High-performance option NVIDIA processor’.
- Click on ‘Apply’ to save the change and restart your PC. Try playing your game to check if the method worked.
#2- Set High-Performance GPU Via Settings
You can use this solution for both UWP/ Windows 10/Java Bedrock if you see that Minecraft is not using my GPU. The settings application in Windows 10 will allow you to select either AMD or NVIDIA GPU as a high-performing GPU for Minecraft. Here are the steps:
- Press the “Windows and I keys” together to open the Settings app on the main screen. From there, go to the ‘System’ section of the menu. Locate the ‘Display’ tab and open it. Now go to the ‘Graphics setting’ at the end of the outlook.

- Select the option ‘Choose and app’ from the available list of options to set a preference in the GPU Setting box. Select the ‘Universal app’ suppose you have a ‘Bedrock’ version of the Microsoft store.
- You will see ‘Minecraft’ in the app list, and you should select it. Click on option ‘Select an app menu’ if you gave the Java’s version of the game. You can either go for the browse option for the classic program or the drop-down menu for the universal apps. Now, click on ‘add’ after choosing Minecraft.
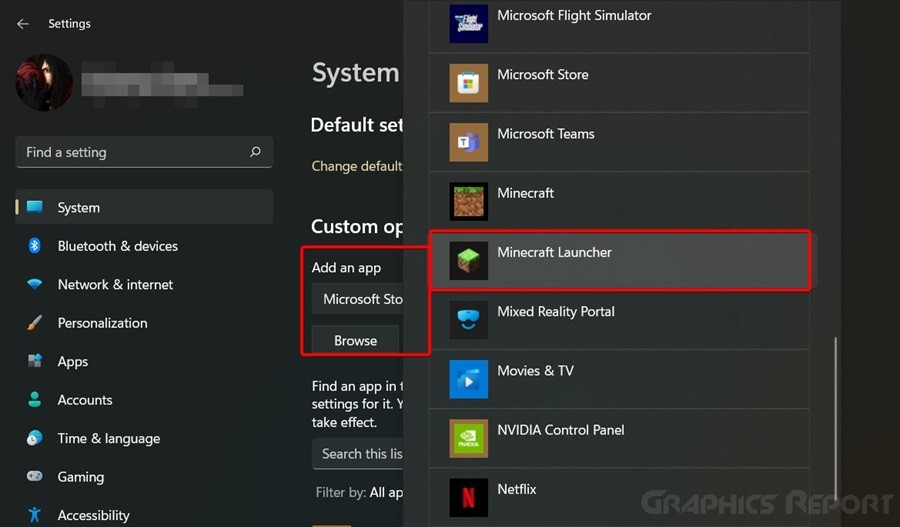
- Chose Minecraft again after adding it, then click on ‘options’. Finally, chose to save after opting for ‘High performance’.
- Now start your game and chose a world in it, wait to it to load, and then reduce the size of the game.
- Opt the ‘Task Manager’ from the context menu by clicking on the taskbar
- Now locate ‘Minecraft’ in the ‘Process’ tab and select the ‘GPU engine’ from the given column and try to go for GPU 1 instead of using the onboard cards that use the GPU.
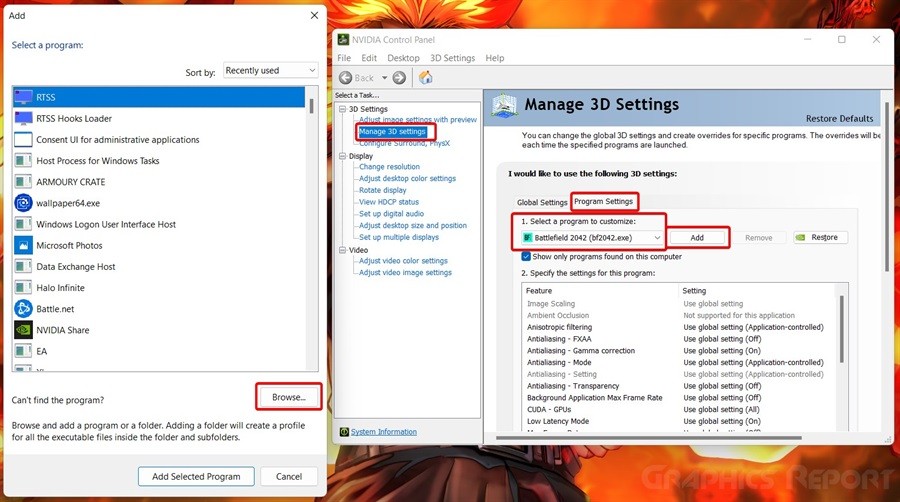
#3- Add Minecraft As A Custom Program In GPU Settings
Both Nvidia and AMD have GPU control panels in which we can add applications and give them customs permissions and/or set the settings according to our needs.
So, in short, what happens after this is that the GPU runs the program directly and also it forces the app to run on certain settings.
- For Nvidia users go to your “Nvidia Control Panel,” then click on “Manage 3D Settings”
- Here select the “Program Settings,” and then click on “Select a program to customize” from this drop-down menu find and select the “Minecraft.exe” or for Gamepass users, find the “Minecraft For Windows 10” file and select it. (if you can’t find it here, click on add and add the game from that menu)
- If you have integrated graphics in your PC, make sure you have selected “High-performance Nvidia Processor” in the “Select the Preferred Graphics Processor for this Program.”
For AMD Radeon users:
- Head to the “Gaming” tab now “click on the three dots” now select “Add A Game” in this window, you need to find and select the “Minecraft.exe” you can find it in the folder in which the game is installed.
- Now you will see a window where you can customly set the game’s settings; I’d recommend you click on the “Tune Game Performance,” then the GPU will set all the settings according to its preference.
#4- Use the AMD Radeon GPU for Minecraft
If you use the AMD Radeon GPU for gaming, this solution will surely make Minecraft use the graphics card. But, first, let’s look at the steps:
- On the desktop, right-click to open the menu and select the ‘AMD Radeon settings’ option. Now go to the ‘System tab’ and click on the ‘Switchable Graphics’ option.
- To check your installed software, click on ‘Installed Profile Application’ then click on ‘Browse’ to select the ‘Javaw.exe’ file for Minecraft. Select the ‘High-performance’ button for the chosen GPU. Soon you will see that your Minecraft not using full GPU; will start using it.
#5- Add Minecraft Java Application To GPU Settings
Suppose you have Minecraft’s Java version, then you will require to add a Java app to GPU 3D program list.
This will make the system use the GPU integratedly, instead of using it dedicatedly. We will start with the way of Minecraft using the Java app and then add the Java app based on the location.
- Start with creating a fresh-new gaming profile and chose the options to ‘keep the launcher open’ to save your profile. Now use this new profile and start your game.
- Once the game starts, press ‘Alt and Tab’ to exit out the game. You will see various options in the game’s launcher like updating notes, profile editor, launcher log, etc. Click on ‘Launcher Log Tab.’
- There you will see a sentence beginning with ‘Half command: this will display the executable java files needed to start the app. Now go to the ‘Windows search menu’ and type the name of your GPU and then open the settings.
- Go to the 3D settings and press on the ‘Program Settings’ button. Then select the option saying ‘Select a program to customize’ and search the java file to add to the list.
- Finally, below those options (‘Select the preferred graphics processor for this program), choose the ‘High-performance NVIDIA processor’ button. after this step, your game should use the graphics card.
These were some of the solutions which can help you in making your Minecraft use GPU for better performance and graphics.
Why Does Minecraft Use An Integrated Graphics Card Instead Of A GPU?
Minecraft uses an integrated graphics card instead of a GPU because the settings are automatically reset every time the graphics driver updates. This usually happens with laptops because they have dual graphics cards.
Many GPU users get confused with the GPU configuration and the options to convert the game from integrated to dedicated GPU for improved performance. This is because Minecraft players usually add an extra external GPU for a better gaming experience.
That external GPU is not the in-built integrated one with the PC processor (because it doesn’t provide good graphics output). Only a few basic Minecraft editions are playable on the default integrated GPU, but the Minecraft Java version gives the players more of a realistic look with a dedicated GPU.
But, it is not that easy to get rid of that integrated graphics card, and it requires careful concentration to move the game to dedicated GPUs.
How To Check If Minecraft Is Using The GPU?
The best and the easiest way to ensure that Minecraft uses your GPU after all the solutions are to use task manager. Follow these easy steps to check if your game is using GPU:
Open Minecraft on your PC or laptop and choose a world to play in. now, let the game load, and once it is loaded, minimize its window.
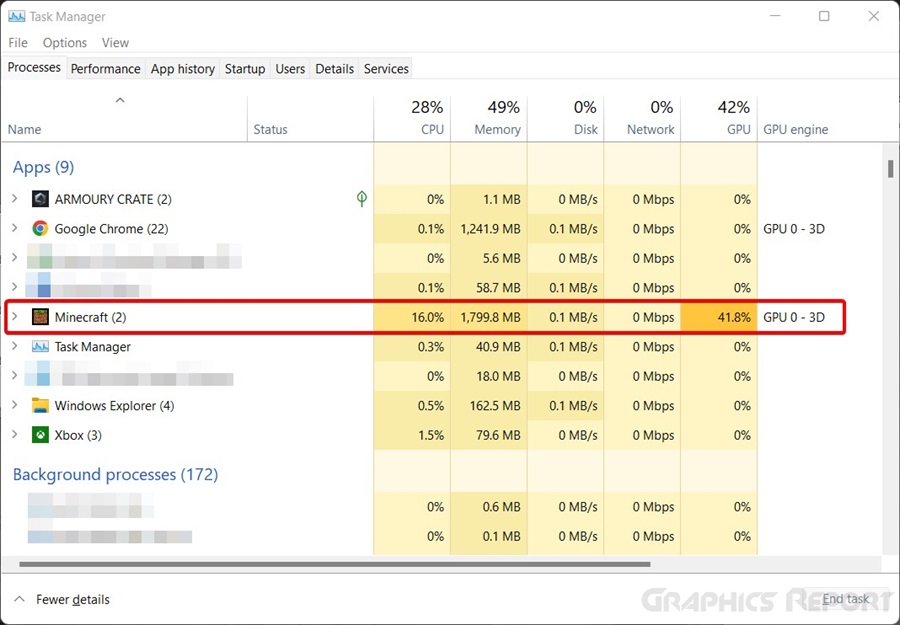
Right-click on the ‘task bar’ to open the ‘Task manager’ and look for Minecraft in the ‘Processes’ tab. Finally, track the performance in the GPU Engine column. If the GPU is in use, you will see it.
These steps can only be performed in Windows 10 because the older versions of Windows don’t offer features like task managers.
Related guides:
What Is Hardware Accelerated GPU Scheduling?
How To Fix “GPU Fans Not Spinning” – Causes & Solutions!
GPU Sag Explained: And How To Fix It?
How To Fix “This Effect Requires GPU Acceleration?”
My Final Thoughts On It!
Minecraft is an amazing game, undoubtedly, with so many amazing resources. But the only issue with it is that it is only playable on the graphics card that is built into the computer. The game is possible to play without a gaming GPU. However, without it, the game is not as enjoyable.
Besides having low FPS, the game also loads very slowly, and the animations are next to non-existent and choppy. As a result, the game is more of a hassle than a game without a GPU.
On the other hand, if you have a GPU, the game will run smoothly and more realistically. As a result, you will have more fun as good graphics and fast performance makes everything worth it.
This is why you should seriously consider getting your Minecraft to work on the GPU. And hopefully, our guide will help you in this process with all the useful solutions.