Graphic cards are a powerful piece of hardware. They enable you to process and render 3D graphics while taking the load off of the CPU. People love to get the most performance out of their card, and they often do so by overclocking it beyond its factory clock speed.
While overclocking is quite common in the world of PCs, you rarely ever hear about underclocking (yes, it’s a real thing). Now, who in their right minds would want to intentionally downgrade their GPU’s performance by underclocking it? You must be crazy to do so! Well, not at all.
Underclocking can prove to be quite beneficial for some users and offer some leg-ups that they desire without losing any negligible performance. So, let’s dive deep into the ins and outs of underclocking and find out what exactly it is and how it might be a good idea to underclock your graphics unit.
What Is Underclocking?
There are a bunch of cores present inside a graphics card that are responsible for actually doing the work and render all the things you see on your screen. These cores run at different speeds, known as clock speed or frequency.
And the higher the clock speeds of the card, the better it will perform as you are pushing it more and more. From the factory, it comes running at a certain clock speed, also known as the engine clock; this frequency can either be increased or, in this case, decreased.
Decreasing the clock speed of your graphics card is known as underclocking and, it is essentially the stark opposite of overclocking. Various things factor into this decision, and you’d be surprised to know how many benefits it can brew for certain gamers and content creators.
Underclocking isn’t for everyone as seldom you’d ever wanna intentionally downgrade the performance of an expensive piece of hardware; I mean, the whole point of it being expensive was for it to be more powerful, better.
There are different ways in which you can get more out of your system, but sometimes purposefully decreasing the clock speed can prove to be more beneficial than overclocking, for instance, having a beefy GPU crammed in a mini ITX case with barely any airflow. As the popular saying goes, “less is more”.
Benefits Of Underclocking A Graphics Card.
Many pros come along with the underclocking of a graphics unit, and many people value them enough to purposefully opt to slow down their GPU for a better-tailored experience. Even after underclocking, in some cases, the difference isn’t even that marginal to cause disparity.
Less Noise From Your GPU Fans.
The harder you push your graphics unit, the more performance it will give you, but that performance comes at a cost of heat, a lot of it. The better your card performs, the more heat it will produce and the more cooling it will need to keep it from thermal throttling or overheating.
So, when you decrease the clock speed and ease up your graphics unit to run at lower speeds, it will generate less heat, and less heat leads to less cooling needed.
Ultimately, the fans won’t need to spin at full RPM to cool it down, and, wow, this is a domino effect; when the fans don’t spin at higher speeds, they won’t create much noise. Giving you an overall quieter system that doesn’t sound like a fat PS4- I mean jet engine.
Lower Power Consumption.
Since the unit is running slower than standard, it won’t need as much power to operate and will work with lower power. The overall consumption would go down, which would help alleviate your electricity bills and who doesn’t want that?
You can even plan and purchase a lower wattage power supply if you are sure that by underclocking your card, you will be fine with a lower-than-recommended power supply, although I don’t recommend this unless you really are confident and comfortable with doing this.
A better example would be if you upgrade your graphics, but your power supply is barely keeping up; underclocking might be the answer to a more stable and safer experience.
Cooler GPU.
Heat is the kryptonite for electronics and especially computers. If your graphics card is running hot, then you run into the chance of seriously damaging it by overheating the unit.
Before it overheats, you will be warned by a sign, thermal throttling, and this happens when your graphics card is not cool enough to maintain the same level of performance throughout.
By underclocking, you will be allowing it to run at lower temperatures since it’s being stressed less than usual. A cooler graphics card is a safer graphics card.
On top of this, some people might be in special situations where they have cases that are very cramped or devoid of airflow/cooling; in cases like these, underclocking will take some burden off the GPU, making it cooler and ensuring that it runs fine even under intense loads.
No Overheating Issues.
You get the gist by now. Less performance = less heat. By decreasing the speed of the unit, you will generate less heat and output less power, so, obviously, the GPU will remain cooler and not run into any overheating issues that could negatively affect your PC.
You end up increasing the longevity of your system by running the card at a safe temperature at all times. It’s not dangerous to overclock (beyond the limit) or even to push the unit beyond the factory clock, but usually, it does have an impact on the lifespan of the card and also mitigates its resale value. No overheating is a win-win for everyone 🙂
Note: Underclocking may seem like a pretty safe thing to do, and in many ways, it is, but there still are potential downsides involved here.
The biggest thing you’d want to worry about is games and applications crashing and giving you errors all the time since they need the full power of your GPU, which you have reduced by underclocking.
Another thing to keep an eye out on is the supply of energy as the PSU may be providing the same amount of power as before to a less power-needy unit; providing too much power to the GPU can overload it and maybe cause hardware damage.
Caution: Before proceeding to underclock or do any tampering with your card, please take all the factors surrounding it into consideration and don’t make an impulse decision. Underclocking is not for the uneducated.
How To Underclock A GPU?
Now that you know what underclocking is, what it does, is it worth it, why you should do it or not, let’s finally discuss the ways you can decrease the clock speed of your graphics card. Follow along carefully and don’t miss any steps or add any of your own without doing some research.
With MSI Afterburner.
MSI’s Afterburner is one of the most utilitarian tools available for PCs today; in many ways, it is the industry’s gold standard. It allows you to monitor and control each and every aspect of your graphics and offers the finest amount of detail regarding all aspects of your GPU. The software is quite straightforward to use, thus making it very user-friendly and ideal for even beginners.

With MSI Afterburner, you can very easily control the clock speed of your graphics card and, in this case, decrease it. Afterburner also allows for memory speed control, but you don’t need to fiddle with that for underclocking.
Another thing that Afterburner offers is custom fan profiles that enable you to set custom fan curves that directly correlate with your card’s temperature allowing you to have diner control over the fan speeds after you underclock your graphics card.
Before I show you how to underclock, you will need to first have a copy of MSI Afterburner download, installed, and ready to go from here. It helps to have the basic understanding of Afterburner but considering you are underclocking your graphics card, I’d assume you already know what you are doing. Let’s begin.
- Launch and open MSI Afterburner.
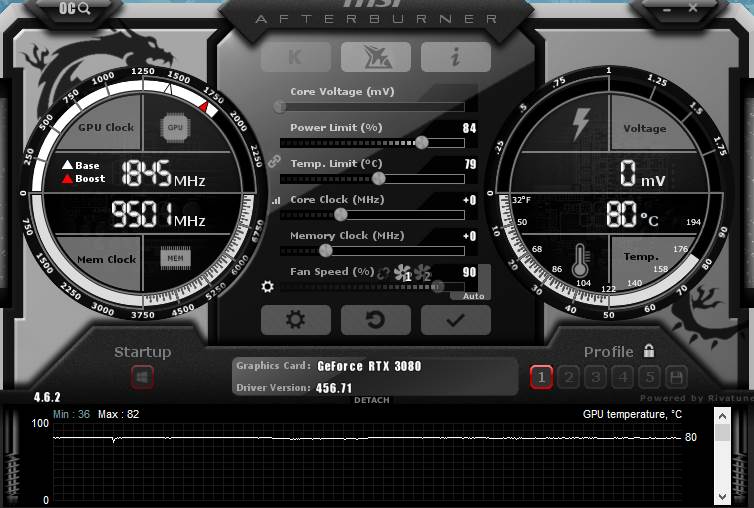
- You will be greeted onto the default interface of Afterburner with 1 big dial on each side and 6 sliders in the middle.
- On the left dial, you will see the clock speed of your card on top and the clock speed of its memory on the bottom.
- On the right dial, you will see the voltage on the top and the temperature on the bottom, respectively.
- In the middle, where all the sliders are located, the 3rd slider will be labeled “Core Clock (Mhz)” and this is what you need to adjust. Sliding towards the left decreases the clock speed, and towards the right, the clock speed increases.
- Start by turning the slider to the left incrementally, and you will see your clock speed falling.
- Now, this is completely up to you, you get to decide how much you want to slow down your GPU, but it’s recommended to only decrease it little by little and monitor your temps along with the updated performance. Find the right balance between the lower clock speed and your desired temps/performance, and you’re golden.
Undervolting - After underclocking, you will also need to reduce the voltage for maximum efficiency. The “Core Voltage (mv)” slider is right above the core clock slider, and you can decrease it in small increments to reduce your voltage. Again, this is up to you but make sure that you don’t reduce it too much or leave it at stock either. This process of reducing the voltage is also known as “undervolting”.
- Keep monitoring your GPU afterward just to make sure that the underclock is stable, and if you face any issues or apps start crashing, then increasing the clock speed by a little may fix it. Again, this is really an experimenting job, and you’ll have to find out what works the best for you.
Fan Curve - Lastly, if you want, you can also set up a custom fan curve with a custom fan profile if you want greater control over the speed of your fans or if the fan speeds are not adjusting properly to the underclock.
- Click on the little gear icon below the “Fan Speed (%)” slider and a graph will pop up displaying the appropriate fan speeds for different temperatures. Here, you can adjust the curve according to your liking and choose the best middle ground between cooling, noise, and performance.
- I recommend using a 1:1 fan speed ratio as it’s a safe bet and will always keep your card cool, but it can prove to be a bit louder for some people, so explore your avenues until you get comfortable.
- Make sure to click “Apply” and save all these settings to a profile, and you’re golden.
Note: MSI Afterburner is a skinnable tool, meaning you can change the appearance of how it looks, so don’t worry if you don’t see the signature dials on the side, as you can always just apply the skin to get that look. By default, MSI Afterburner does come with the dial interface.
By Using ATITool.
You can use ATITool to underclock your graphics unit as well. The catch with this software is that it only works with ATI (AMD) cards, and the UI does look quite ancient. Regardless, if you have an ATI GPU and want to adjust your clock speeds, then it’s fairly easy to do it. Download ATITool from here.
- Launch ATITool.
- Right away, you’ll see 2 sliders on your right and a couple of buttons on the left.
- Being a slightly older tool, ATITool does not save the adjusted clock speeds automatically and resets every time you boot up your computer.
- To make sure that the settings remain permanent, you’ll have to make a new profile and save it there.
- Click on the “New” button located at the top of the window, type in whatever you want to name your new profile.
- Now click “Settings” and from the top drop-down menu, select “Startup”.
- It’s fairly simple to grasp what’s going on here. Make sure all 3 checkboxes are checked and that your new profile is selected as the default. Click on the first option that reads “Every time ATITool is launched, load profile” and select your new custom profile from there.
- Now below that option, you’ll see another option saying “Load on Windows Startup via”, select “Startup Menu (all users)”.
- Lastly, make sure to click on the last checkbox that’s beneath these two options and ensure that all 3 checkboxes are, in fact, checked.
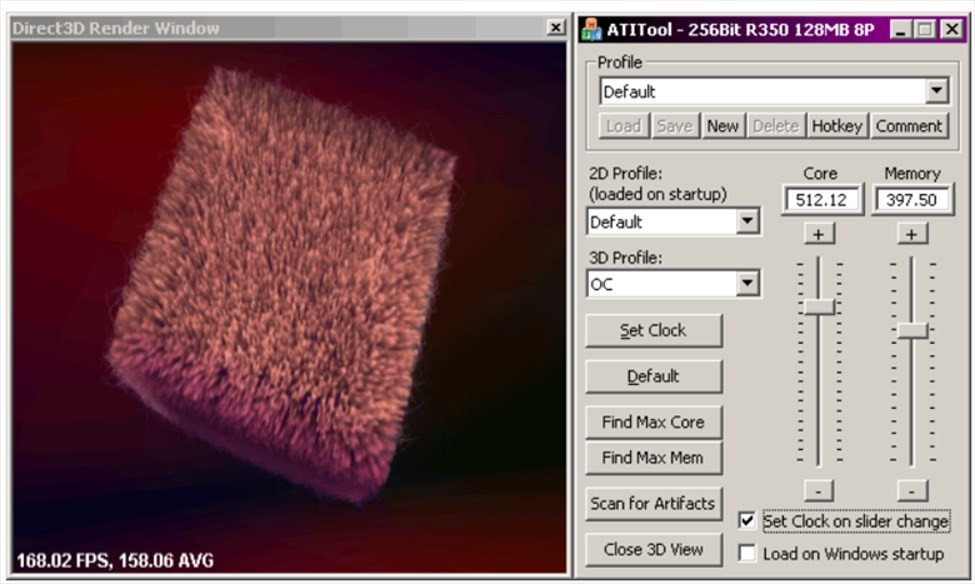
- After you’ve gone through all that, just return to the main by clicking on Exit and decrease your GPU’s clock speed by lowering down the bar on the slider that reads “Core”.
- By now, you know how everything works; decrease little by little, keep monitoring temps and performance, find the best midpoint between power and efficiency, yadda yadda.
Using CoolBits To Underclock Your Video Card.
CoolBits is also a blast from the past with it’s a bit different from both ATITools and MSI Afterburner as it’s not an application itself but rather a registry key that, after installing, opens up your NVIDIA Control Panel to a whole new set of capabilities that it never had before.
Now, mind you, these settings are hidden by NVIDIA because they are a bit advanced for the average user and can cause serious damage to your hardware if not used properly.
CoolBits only works with NVIDIA GPUs and will allow you to adjust the clock speed of both the cores and memory in your card, and it’s fairly easy to do so as well.
Click here, and you’ll be taken to a webpage that has a bunch of text on it and nothing else, don’t worry; that’s how it’s supposed to be. Just click on the download button and hit “Save As,” and then save (duh) the file. After saving it, click on it and select “Yes” when Windows asks you if you want to add some things to the registry.
- Now, right-click on your Desktop.
- Select NVIDIA Control Panel and open it.
- Double-click on “Display” and it will bring up the “Display Properties”.
- Then select the “Settings” tab and click the “Advanced” button.
- Select the “NVIDIA” tab.
- Click on the “Clock Frequencies” option in the left menu under the “Performance and Quality Settings”.
- Here, you will see 2 sliders labeled “Core clock frequency” and “Memory clock frequency”.
- Before fiddling with the sliders, select the “Manual overclocking option” as compared to the “No overclocking” one. Both these options will be right above the sliders.
- Adjust the former slider that says “Core clock frequency” according to your liking, sliding towards the left will decrease the clock speed, and towards the right, it will increase.
- Decrease the clock speed by however much you want. You know the drill by now.
- Make sure to click on the “Apply settings at startup” checkbox, and that’s it.

Underclocking Vs. Undervolting.
Underclocking and undervolting are two different things. Decreasing the speed of the cores in your GPU is known as underclocking, while decreasing the voltage input of your GPU is known as undervolting.
When you undervolt, you essentially reduce the amount of electricity that’s going to the card and the amount of electricity that the power supply is pushing through.
Undervolting is often done alongside underclocking to achieve maximum efficiency and the best temperatures as less electricity going to the card means less heat being generated.

However, undervolting is not as straightforward as underclocking, and unless you know what you’re doing, undervolting is not all daisies and gardens, and I’d not recommend you to do it as messing around with the actual voltage of your GPU can cause some serious damage to it if not done right, it can even completely kill it very easily.
Underclocking is, well, by now, you know what it is. The cores inside your graphics unit run at a certain speed, and those speeds are your “clock speeds” and they indicate how many processes your GPU cycle through in one second, so decreasing the clock speed of your card is known as “underclocking”.
There are many upsides along with downsides to this, and it can prove to quite beneficial to some people while at the same time, many will never want to even try this, and unless you want to do it or if you must underclock, I don’t think anyone would purposefully want to slow their computer down.
Final Thoughts On It!
Underclocking is really an adventurer’s virtue. It’s a process that involves tedious monitoring and back and forth to find the best middle ground between the raw performance coming from your card and how efficient it can get.
It isn’t meant for everyone, and certainly, the majority would never even think about intentionally slowing down their GPU, but for others, it had benefits that exceed the ones provided by overclocking.
To each their own, I guess. Reduced temperatures, power draw, noise levels, and a less prone to overheating card are the advantages that underclocking offers, just at the cost of reduced performance and along with undervolting, you can make your computer an efficiency beast, or you might just not care and want to keep your computer away from underclocking no matter what.