Nvidia owners don’t need any introduction to Geforce Experience. It is a well-known utility program, and it is loved by everyone in the gaming community.
It is like a companion app to your Graphic cards. As a caretaker, it keeps your graphics driver updated and does optimization for your games. You can even share your gameplay live with your friends or record your highlights and memorable moments.
Nvidia provides frequent updates and overhauls to this graphics software, but like every other update, you might face some bugs.
Most common is the software crashing and giving a warning error GeForce Experience, something went wrong. Now, the cause of this instability issue can be anything. Several reasons come to mind, but thankfully, the solution is simple and to the point. No technicalities are involved.
Let’s start looking at possible reasons and their solutions one by one
How To Fix GeForce Experience Something Went Wrong?
There is no absolute reason that I can put my finger on. I can, however, address all possible scenarios that create this issue.
Maybe it’s your driver versions that are incompatible, or GeForce experience files got corrupted by some anomaly or virus. GeForce is a stable software that can sometimes cause issues and crashes.
Some solutions can fix these issues from happening again. Before you try to attempt these solutions yourself, Try restarting your PC, and if the issue is still there, then you can further proceed with our guide and what we think is the best way you can eliminate this issue.
Related errors:
Unable to connect to Nvidia solved
Nvidia control panel not opening fixed
Minecraft not using GPU?
#1- Kill NVIDIA Processes
Geforce experience can sometimes malfunction on startup, or certain processes did not launch on startup with GeForce Experience. In any situation, the best solution is to end the running processes and relaunch them properly.
A task manager is absolutely crucial when dealing with kinds of processes. Task manager is a utility tool in windows that helps you monitor all active services on your PC. From there, we can kill the Nvidia processes and then reboot the PC to give GeForce Experience a fresh start.
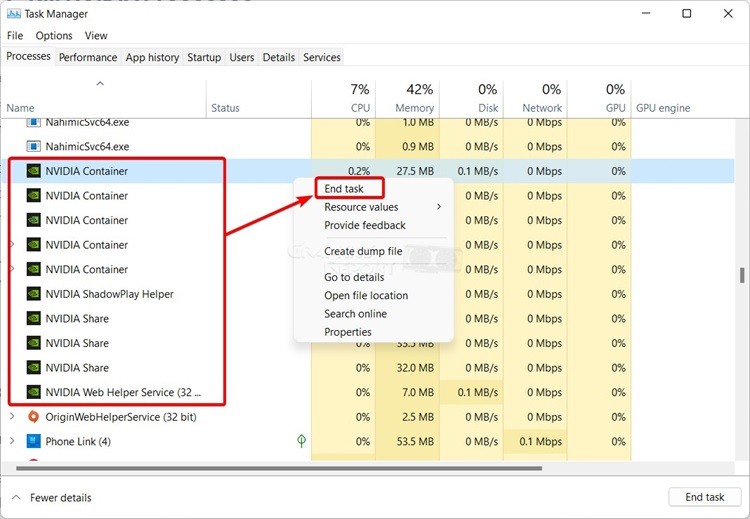
Press the combination of CTRL + SHIFT + ESC to open the task manager window. You will see dozens of processes active in your windows at the moment. You are going to look for Nvidia processes.
- NVIDIA Backend (32 bit)
- NVIDIA Driver Helper Service
- NVIDIA Network service (32 bit)
- NVIDIA Settings
- NVIDIA User Experience Driver Component
Locate them and eliminate them one by one by right-clicking on each process and selecting the end task action from the drop-down menu. Now, after you are finished, close the task manager and try to open GeForce Experience. If the problem still exists, try rebooting your PC
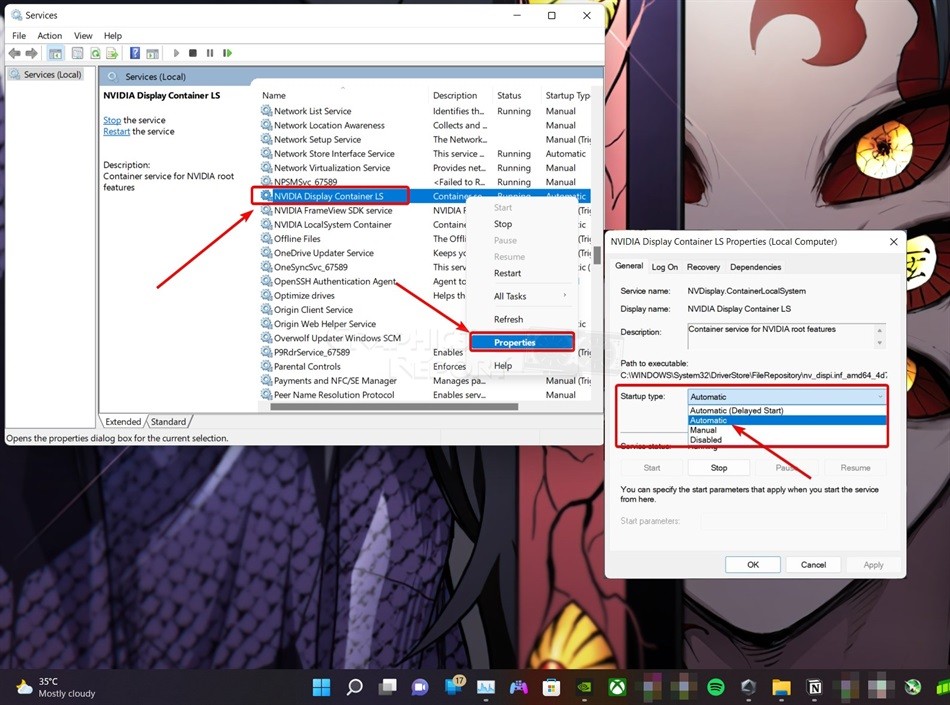
#2- Changing ‘NVIDIA Display Container LS’ Settings
Display container services are vital to Nvidia’s operations. This service includes all of the features that are required for Nvidia to run. Users reported they were having issues regarding the GeForce experience, and this service was denying them access or hindering the launch of GeForce Experience software.
The reason could be the startup setting is disabled. This setting is by default disabled, and so the first thing you have to do is to open the windows run dialog box by pressing “Windows + R”. in the dialog box that appears, write “services.msc” and enter.
This will take you to the services window where you can access all services, including the “Nvidia display container LS.” locate this service and go to the “properties.” Change the “startup type to automatic” and then press apply.
Now again, open the run dialog box and write “msconfig”. Look for services on the screen and check to hide all Microsoft services. You can restart your PC now, and hopefully, this will work when you launch GeForce Experience
#3- Changing User Folder Name
You can also try changing your User folder name to see if Nvidia gets easy access to your PC files. This may sound strange, but it works, so why not try it?
First, you need to check that you have the correct name for that folder. Go to your main drive, which in most cases, by default, is the “C drive.” Navigate to the “Users folder,” and you will see your username folder.
Look if there are any numerical symbols in the name. Remove them and rename the folder as GF experience. Once you are done, all that is left to do is to restart Nvidia services and check if this solution works. Restart your PC if this doesn’t solve the issue
#4- Run GeForce Experience In Compatibility Mode
If you are having issues launching GeForce Experience after you have installed it, then this might be a compatibility issue. Your windows are not compatible with this software.
There is also a chance that your system does not fulfill the requirements for this software. You can start by changing compatibility settings if you want to use GeForce Experience.
“Right-click on the GeForce Experience icon” and go to the “properties” in the drop-down menu. A new window will appear, and on the top, you’ll see some tabs. Click on the compatibility tab.
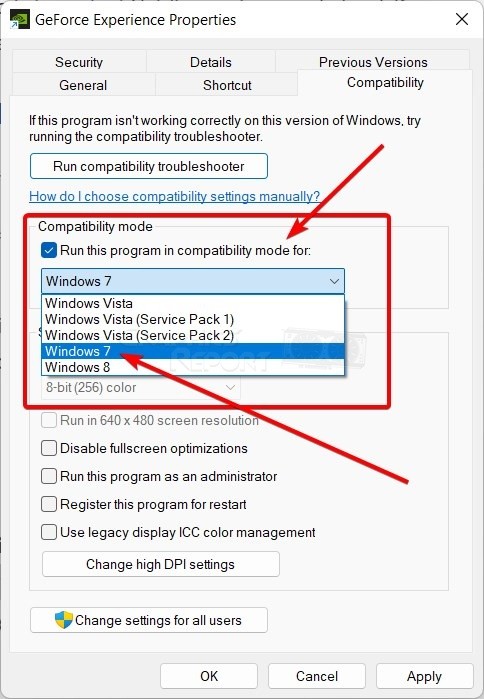
Here you just have to check the box that says “run this program in compatibility mode”: under this heading, click on the drop-down bar and “select windows 7”. Click apply and then try opening this software. You can repeat this process by changing the windows version if this doesn’t work.
#5- Stop All GeForce Tasks In The Task Manager
Sometimes programs fail to launch correctly, and as a result, half of their processes fail to open while the remaining are working in the background.
Quite a mess, is it? But the quick fix is that you just have to close those active processes and relaunch GeForce, so this time it boots up properly. “Hold CTRL + SHIFT + R” to access the task manager, there isn’t a specific service or software that you are looking for.
You have to close all Nvidia and GeForce-related processes. Look for them, most of them will be starting with the word Nvidia, so it’s easier to find them in one place. Close each task by right-clicking on the process and selecting the end task.
After you are done with the massacre, try opening GeForce again. Hopefully, this time you will see the expected results, and still, by any chance, it doesn’t open. Look for another solution
#6- Reinstalling The Visual C++ Redistributable Packages
Another common issue you can point out is the incomplete installation of some programs. If your program is frequently crashing, it’s safe to say that some files are missing from your system.
You have to download Microsoft redistributable packages to fill the missing files. You can easily veer off and visit malicious websites to download these packages. Don’t do it if you love your PC. Avoid those third-party websites at all costs.
You can easily download redistributable packages from Microsoft’s official website for free. Visit Microsoft’s website and go to the download portal. Search for Visual C++ redistributable package and click download.
Select the file vc_redistx64.exe from the options below and download it. Install the package on your PC and try opening GeForce Experience after the installation is complete. If the problem persists, try another solution.
#7- Reinstalling The GeForce Application
This is the simplest and oldest trick in the book. Reinstall the whole Software from the start. One of the reasons your software isn’t working could be the corrupt files or the missing data in those files.
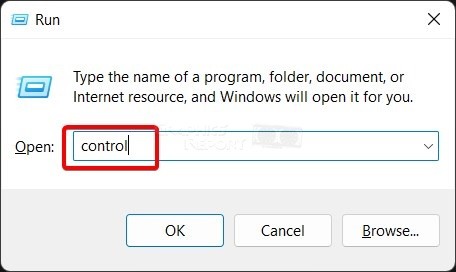
- A simple way to do this fix is to open the Run dialog box by pressing “Windows + R” and writing control in it. Press enter, and you will open the control panel.
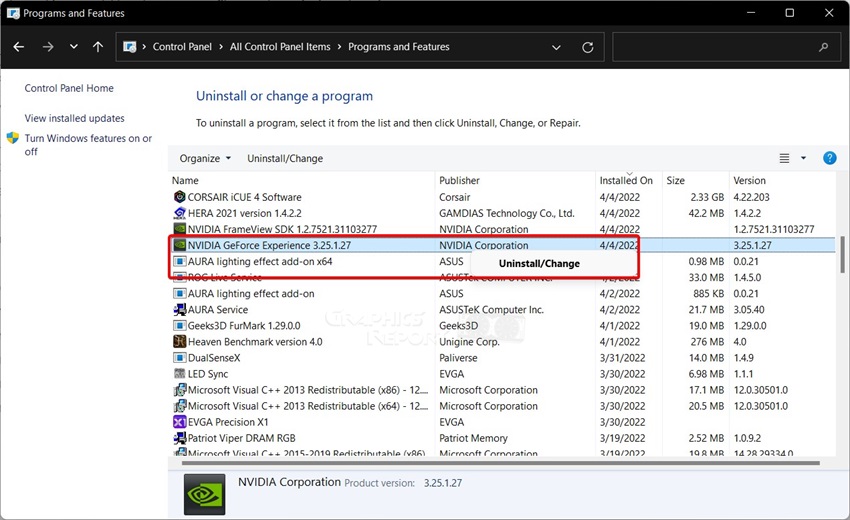
- Look at the bottom for “Programs And Features” under the heading Programs. “Uninstall Geforce Experience.” If there are any other programs related to GeForce experience, uninstall them too.
- Now head to the Nvidia website and download GeForce Experience as you did before. This time perform a clean installation.
- A clean installation will eradicate any remaining previous data of this software and download all new files from scratch.
- Reboot your PC and try launching GeForce Experience. This time, the fix will work because clean installation also ensures that you are getting an up-to-date version of your program.
#8- Updating Graphics Driver
If you have an older card, you may have issues finding drivers that are not compatible anymore with your GPU, in that case, the best option is to update the Graphics driver.
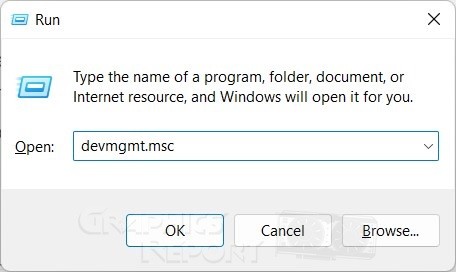
This is an easy fix, and it wouldn’t take much time. You have to open the “Run Dialog” box and type the “devmgmt.msc” Press enter, and inside the device manager, you can see all your hardware that is connected with your PC right now.
Look for the heading named “Display Adapters” You will see your current display device that you are using right now on your PC. “Right-click on it and select update driver” from the drop-down menu.
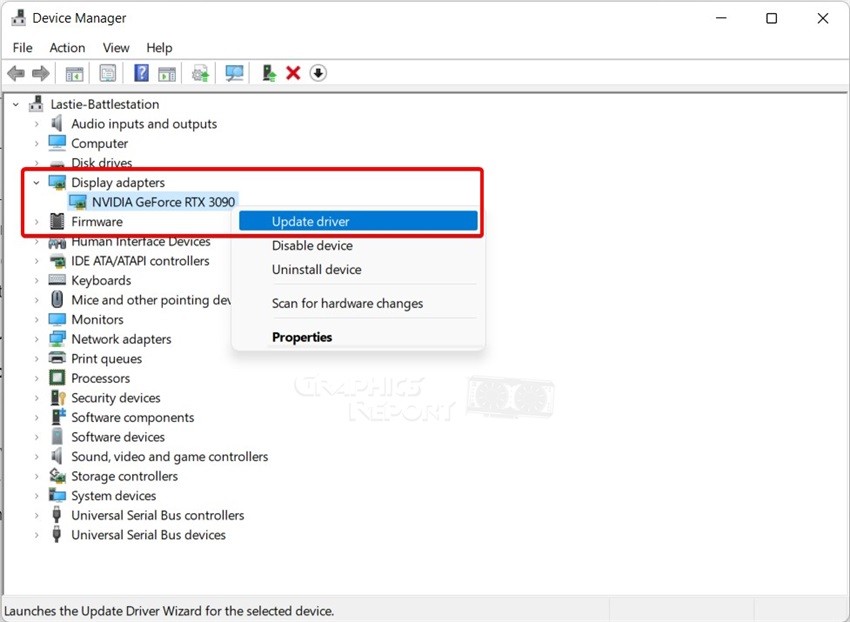
Your windows will start detecting if there is any new version available for download, and then as soon as it finds it, windows will update your drivers. This is the safest and quickest method you can use; just remember to stay away from third-party services.
#9- Install The NVIDIA Driver Manually
You may not notice if your drivers are getting old, but they can cause issues, especially if the driver version you are using is becoming obsolete or is corrupt.
The least you can do is to make sure you are up-to-date all the time with drivers. They are free, and it doesn’t hurt to check every month about new updates.
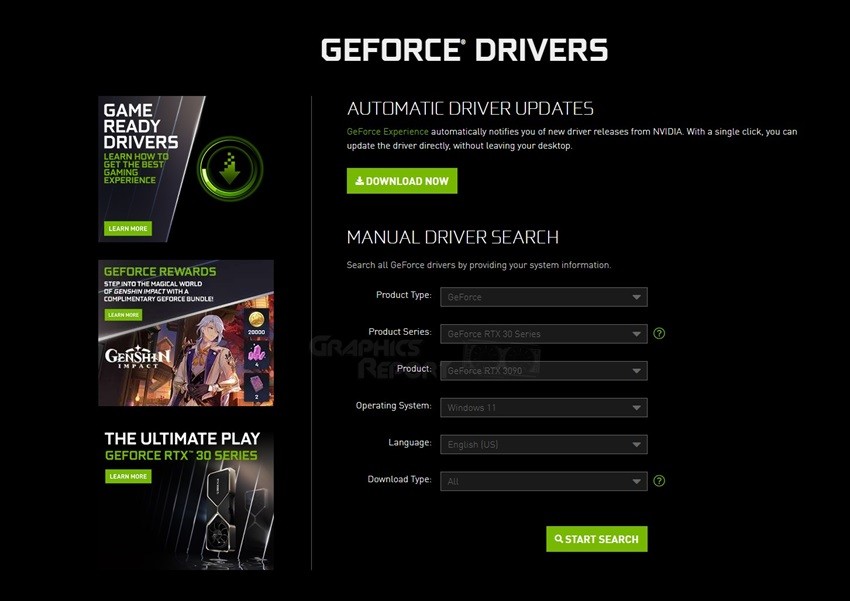
Now usually, Nvidia users update their drivers from the GeForce experience itself, but the main issue is that GeForce Experience is not working. You have to visit the Nvidia website and manually download drivers yourself.
Search for your GPU model and brand. Download it and install the file on your system. Your screen may blink a few times during installation, and that is completely okay. After you are done installing, reboot your PC and check if the problem is solved or not.
#10- Changing Paths In Registry Editor
This is for those users who use multiple drives to store their data. Windows can get confused and might install, save or update data on other drives.
To resolve this issue, you have to use the registry editor. Type Regedit is a windows utility tool that allows you to manipulate, create or edit registry keys on an administrative level.
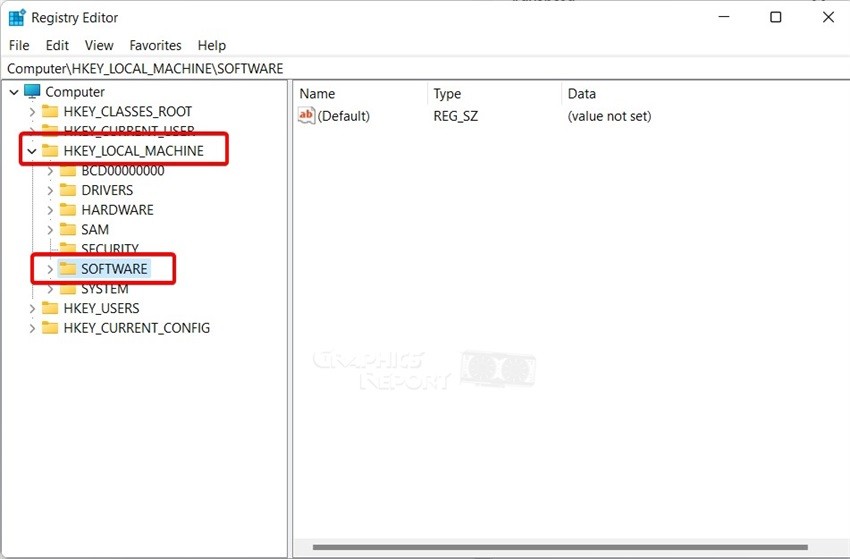
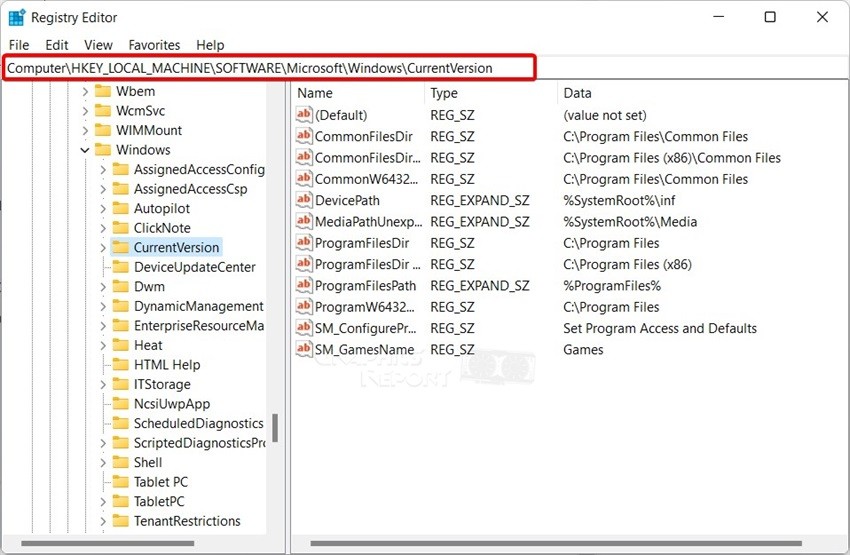
- Open the Run dialog box by pressing “Windows + R and typing Regedit.” You will find the registry editor in front of you.

- From here, you have to navigate through the path. “Click on HKEY_LOCAL_MACHINE” to expand the subfolders. Go to “Software” and from their steer into “Microsft>Windows>Current Version.”
- Click on the “Current Version,” and on the right side, you will see some values appear. You have to check those values one by one that they are on the same drive as your windows. You can edit the values yourself if there is any issue you find.
- After you have thoroughly checked, reinstall the GeForce Experience driver along with all other Nvidia-related drivers.
- Restart your PC to ensure your data is refreshed, and then try launching GeForce Experience.
#11- Updating DirectX
Before trying anything yourself, try updating DirectX to its latest version. DirectX is a collection of APIs responsible for handling multimedia files, game applications, etc., which could fix your solution permanently.
If you are using windows 10, then DirectX12 comes pre-installed with it. You just have to update it to its latest version. It is available for free on Microsoft’s site for download.
Visit the website and search for DirectX End-User Runtime Web Installer. Download it and head over to the folder where you downloaded this file. Look for “dxwebsetup.exe” and launch it.
Follow the instructions, check the “I accept the agreement box,” and wait for DirectX to install. After that, restart your PC for changes to save. Launch GeForce Experience and see if it works this time or not.
#12- Reset network adapter
This could fix this issue more likely, although it may not seem like it at first. Many users have reported that their issue was fixed after resetting their adapter settings to default settings.
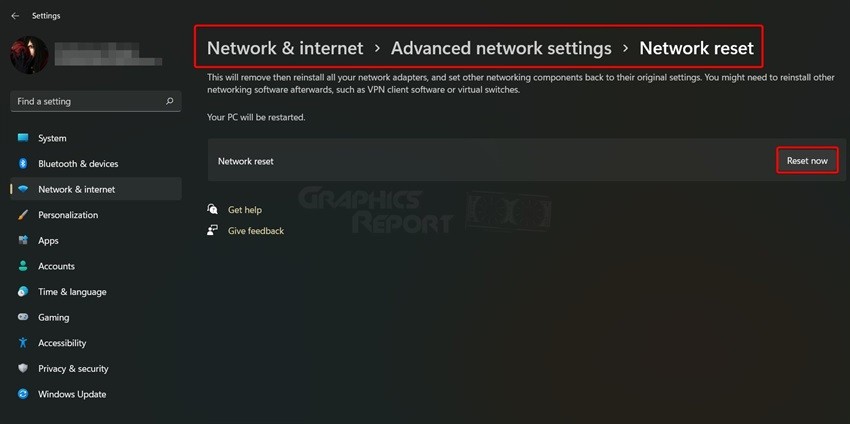
- One downside is that resetting network adapters could delete your passwords or other data. Start by opening notifications from the taskbar and go to all settings.
- Navigate to network and settings and go right at the bottom. You will see “network reset options.” Click it, and your network settings will be reset.
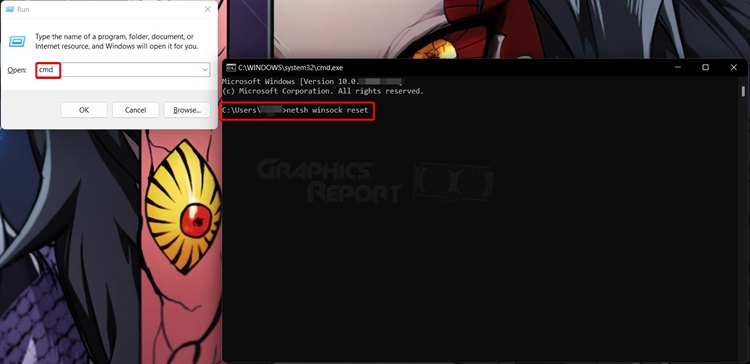
- Another alternate way to do a reset is to go for the “Run dialog box and type cmd” This will open the command prompt on your screen.
- Write the following command “netsh winsock reset” Your network settings will be flushed and reset.
- Restart to your pc for these settings to take effect, and then launch GeForce Experience.
#13- Installing Available Updates For Windows 10
If, for some reason, you are still facing issues with GeForce Experience, then this means all other solutions failed. However, I still got the last trick up my sleeve which is also the most common one.
Check available updates for windows 10 and update it. This could be a reason because if your Windows is not up to date, then you might face compatibility issues with some software.
- Go to settings and head over to the “Update and Security.” You will find the “Check for Updates Option.”
- Click it and wait for windows to search for available updates. Make sure your internet connection is not metered, as this setting restricts windows updates.
- Once updates are finished installing, windows will ask you to restart for these settings to take effect. Restart your PC and Launch GeForce Experience while hoping for the best.
My Final Thoughts On It!
All these solutions that I have mentioned in this article will help you troubleshoot your GeForce Experience issues. Despite being an official software, it is not free of bugs and issues.
“Something went wrong” is a common issue that any Nvidia can face, the good news is that the fix is quite easy and simple, and you have not one, not two, but more than dozen of fixes for this single issue. And if you try each and single one by one, you will hopefully conquer this error.
If you have new and upgraded hardware, you are less likely to face this issue as compared to someone using old graphic cards. And even after all these solutions and fixes, the problem still remains; I advise you to contact a professional and inform him about your problem or let them diagnose your PC hardware.
It is the possibility that your hardware might be faulty and in need of change. You can also contact Nvidia’s official customer support as they are experts on these issues.
Related guides: