If you are constantly trying to connect to NVIDIA and getting the same message repeatedly, there is nothing to worry about. Because there are many NVIDIA users on the same boat who receive the message “Unable to connect to NVIDIA,” try again later when they use the GeForce Experience to update their display driver.
The error usually appears on your Windows 7/8/10, and it often appears because the NVIDIA GeForce Experience app is not connecting to the server. The app is a part of the NVIDIA graphics driver and is very useful in updating the video drivers, optimizing game settings, recording videos, etc.
However, the unable to connect NVIDIA windows 10 and 11 issue is solvable. There are many ways to solve this connection issue, and I will discuss some of the most effective solutions.
What Causes Unable To Connect To Nvidia Error?
The NVIDIA unable to connect error only occurs for the GeForce Experience app in NVIDIA. This is why the error is solely related to this app. There are instances when the error is caused by a malfunction of some other service requiring the GeForce to work smoothly.
But, let me tell you about a few reasons why the error happens.
Outdated software:
NVIDIA is famous for regularly releasing new versions of the GeForce Experience Program, but users miss the recent update for the app most of the time. In such cases, the app might show a connection error of cannot connect to NVIDIA.
Service problem:
Mostly, this is the problem behind connection issues to NVIDIA. Most of the users who face this issue; have issues with their computers. And to automatically update the NVIDIA drives, it requires a proper functioning Network service.
But if the service is not running as it should, then you will face the unable to connect NVIDIA issue in the GeForce program.
These two scenarios can pretty much halt your app of the GeForce program, so you need to find ways to solve this issue. That is what I am here for; I will guide you through a list of potential solutions to connect back to NVIDIA.
How To Fix Unable To Connect To Nvidia Error?
When NVIDIA GeForce cannot connect to the server, our first reaction is panic and then thinking of taking the PC to a repair store and getting it fixed. But what if I told you that you could easily solve this issue at home.
There is no need to worry as long as you follow the right steps and sequence. So, buckle up for some useful solutions to your NVIDIA problem.
Related guides:
Fixed “graphics card not detected” on windows 10
Fixed “this effect requires GPU acceleration?”
How to fix “GPU fans not spinning” in 2023?
GPU sag explained: and how to fix it easily?
How to fix Minecraft not using GPU?
GPU coil whine explained
#1- Change The Status of NVIDIA Services
The main reason why GeForce’s experience cannot connect to NVIDIA is that NVIDIA Network Services cant run itself on the PC. But, you can solve this issue by changing the status of NVIDIA services. Here are the steps you can follow to do it on any Windows OS.
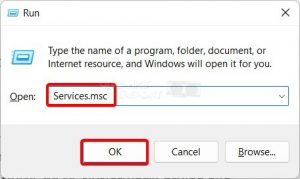
- Open the Run dialog box by pressing the ‘Win + R’ keys together. And when the box appears, type ‘Services.msc’ in the search column and press ‘OK.’
- Now, on the services page, look for ‘NVIDIA Network Service’ and then look for status. If it says ‘Starting’ under the status column, the service cannot start independently. Leave the page for the time being.
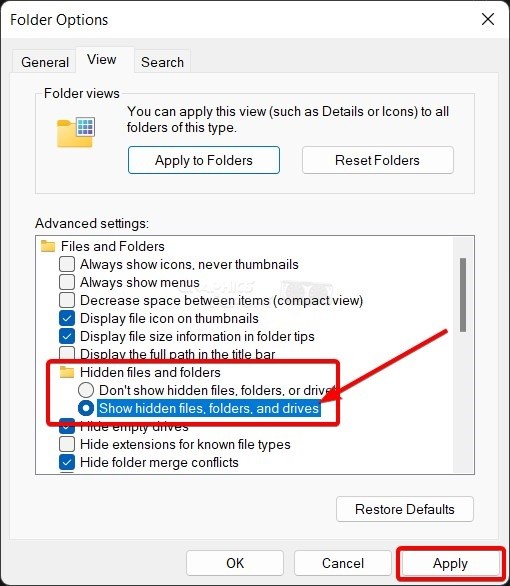
- Open the Windows Explorer and go to the ‘ProgramData’ folder, usually in ‘Drive C.’ Search for NVIDIA Corp in that Folder. But if you can’t find it, then it must be hidden. Click ‘Organize’ from the top menu and select the ’Folder and search options to unhide the Folder. Then choose the ‘View’ tab and go to the ‘Advanced Settings.’ Finally, check the ‘Show hidden files, drives, and folder’s box and click on ‘Apply .’ Once this step is done, you will be able to see ‘ProgramData’ in Drive C.
- Go to the NVIDIA Corp folder and enter the ‘NetService’ Folder. Look for the ‘NSManagedTasks.xml’ file. Delete or move this file out of the Folder. Then right-click on the taskbar and choose the ‘Start Task Manager’ from the available options. Now choose the ‘Show processes from all users’ option, and from there, go to ‘NvNetworkService.exe,’ right-click on it, and ‘End Process.’
- Go back to Services Page and refresh it. You will see that the status of the NVIDIA Network Service is empty. Click on the NVIDIA Network Service and choose ‘Start’ from the options.
- In a while, you will see the status displaying ‘Started,’ and then you can close the window.
This whole process is bound to update your NVIDIA driver and fix the issue of GeForce unable to connect to NVIDIA.
#2- Reinstall Latest GeForce Experience Program
Sometimes, the connection issue occurs because the GeForce Experience app on your computer is outdated (as I already told you, NVIDIA regularly releases app updates). So, the simple solution is to uninstall and then reinstall the latest version, which you can download from the official website of NVIDIA.
But, before you uninstall the old version, download the new version and save it somewhere separately. Once you do that, you can follow the steps below to uninstall and reinstall the program.
Open ‘the start menu and go to settings, then go on the ‘Apps’ option, look for ‘GeForce Experience’ in the app list, click on the ‘Uninstall’ button, and follow the instructions that your PC gives you.
- Once the app is installed, restart your PC.
- After reboot, open the updated installer of the GeForce Experience file and choose ‘Run as Administrator.’ Click yes on the user account control window and then wait for the installer to load. Once loaded, click on ‘agree and install’ to accept the NVIDIA agreement.
- Finally, wait for the installation to complete and then restart the computer to solve your ‘Unable to connect to NVIDIA’ error. If this doesn’t work, then you can try the next solution.
#3- Update NVIDIA Drivers
An outdated graphics card driver may lead to a connection issue with NVIDIA. So updating is crucial if you don’t want the app to stop working. Here is how you can update it:
- Open ‘Device Manager’ via the start menu and then click on ‘Display Manager’ in the Device Manager window to expand it.
- Then click on NVIDIA graphics card and choose ‘Update Driver,’ then select the option of ‘Search automatically for updated driver software’. The windows will automatically start searching, downloading, and installing the latest version of the NVIDIA graphics card.
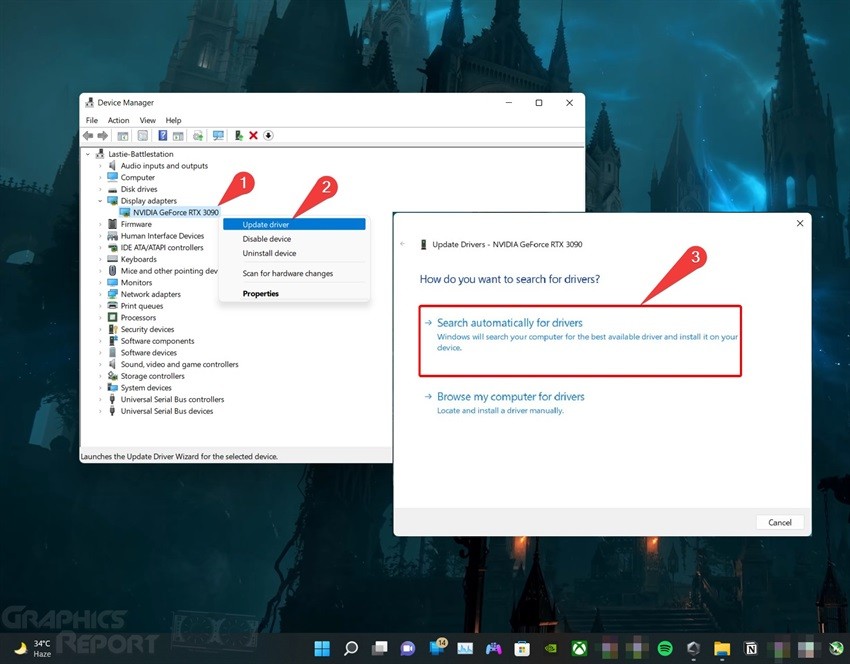
- Finally, restart your PC and check whether or not the NVIDIA update cannot connect or the issue is solved.
Side note: you can also uninstall the device instead of updating it and then reinstall the driver from NVIDIA’s official website.
#4- Uninstall And Reinstall GeForce Experience
You can easily solve the connection issue by uninstalling and then reinstalling the GeForce Experience app. Then, all you have to do is follow the steps I am mentioning.
- On your main screen, press ‘Win + R’ at the same time to open a Run box.
- Type ‘Devmgmt.msc’ and ‘enter’ to open the device manager window. Now double click on the ‘display adapters’ to expand this option. Then right-click on the NVIDIA graphics card installed on your PC. Now an option will pop up to uninstall the device. Choose that.
- Once you select it, confirm it in the dialog box and ‘delete the driver’ check the box and finally uninstall it.
- Restart your PC and wait a while.
- Open your browser and go to the official website of NVIDIA: https://www.NVIDIA.com/en-us/. From here, you can download the correct app installer. Now, on the official website, mention the details of your system and the graphics card model.
- Follow all the instructions on your screen to download the GeForce Experience.
- Once the installer is complete, click on the downloaded file and follow the installer’s instructions.
- Once installed, you can restart your computer and check whether or not the issue is solved.
#5- Restart NVIDIA Network Services
Another helpful solution to the connection problem is simply to restart your NVIDIA Network Services. Although restarting is a simple process and takes hardly 5 minutes to complete, here is how to do it.
- Press the ‘windows key + R’ from your keyboard, and once the dialog box opens, type ‘services.msc’ in it and ‘Enter.’
- Now, look for the following services: NVIDIA Display Container LS, NVIDIA NetworkService Container, NVIDIA LocalSystem Container, and NVIDIA Telemetry Container. NVIDIA Display Container LS and’ right-click on it. Choose the ‘properties’ from the context menu.
- Once the properties open, look for the Service Status and click ‘stop’ under it.

- Now click on the drop-down list beside ‘startup type’ and select automatically. Wait for a few moments and then click ‘start.’ Choose ‘Apply’ to save your changes.
- Now repeat the steps for all the services mentioned in step 2.
#6- Delete NSManagedTasks.xml To Disable NVIDIA Services
There is a chance that the connection problem you are facing while using NVIDIA GeForce could be that the NVIDIA Network Services’ status is stuck in the starting status.
This can lead to connection problems in the network and make it impossible for you to download things via GeForce Experience. But, you can disable NVIDIA services to fix this problem.
Here is how:
- Press the ‘windows key + R’ from your keyboard, and once the dialog box opens, type ‘services.msc’ in it and ‘Enter.’
- Press ‘N’ from your keyboard to locate the NVIDIA Network Services and ensure that the service status is ‘Starting’ and not ‘Started.’
- Now, open ‘C:\ProgramData\NVIDIA Corporation\NetService\’. And delete ‘NSManagedTasks.xml.’ This file should be in XML Document. But if you can’t find it, then it must be hidden. Click ‘Organize’ from the top menu and select the ’Folder and search options to unhide the Folder. Then choose the ‘View‘ tab and go to the ‘Advanced Settings.’ finally, check the box of ‘Show hidden files, drives, and folders and click on ‘Apply.’ Once this step is done, you will be able to see hidden files.
- Now on your keyboard, press ‘Windows key + X’ and then open the ‘task manager. Click on the ‘details’ tab and ‘NVNetworkService.exe’ and click on ‘end task.’
- Go back to the ‘Service’ window and’ right-click on NVIDIA Network Services to start it.
#7- Changing Hosts File
Changing your windows host files is the ultimate solution to solve your NVIDIA connection problem, and you can easily do it without professional help. Just follow the below-mentioned steps.
- Open the ‘start menu and search for ‘folder options.’ Right-click on the result and open the ‘file explorer option. Then open ‘View’ and go to ‘advanced settings, ‘hidden files’ and finally open ‘folders.’ Select the ‘radio’ button.
- Then click on ‘OK’ and “apply’ to save changes.
- Now ‘right-click on start and go to ‘file explorer’ from the menu.
- Write ‘C:\Windows\System32\drivers\etc in the ‘File explorer’ address bar to reach the folder.
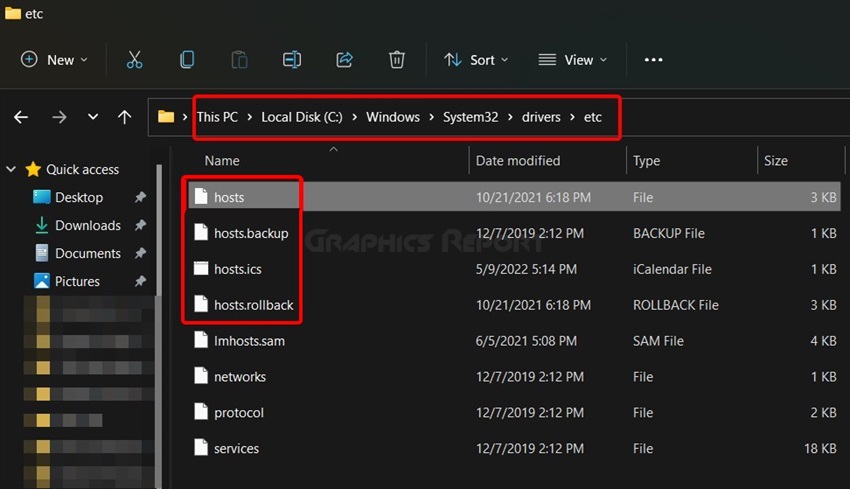
- Now from the etc. Copy the host files, and paste them onto the ‘desktop.’
- Click on the host files on the desktop, and when it asks, ‘How do you want to open this file, select the notepad and click ‘OK.’
- Now that the files are open in the ‘notepad,’ you can add or remove any links from it. But remember to save it.
- Now, drag the host files from the desktop to the, etc. Folder in ‘File Explorer. Select the option of ‘Replace the file’ and then press ‘Continue’ to save changes.
#8- Update Your Windows
It is possible that your GeForce Experience is not working because the Windows version you are trying to run is outdated. However, you can fix it by updating your operating system. Here is how to do it.
- Search for ‘Windows update settings’ in the start menu and once you find it, click on ‘update and security and select the ‘windows update.’
- Now click on the ‘check for update’s button and allow installation of all the windows updates.
- While the installation is happening, your windows might restart many times. Do not interrupt the process.
- After the installation is complete, you can try running your app and see if the issue has been resolved or not.
My Final Thoughts On It!
Hopefully, these solutions will have proved to you while trying to solve the connection issue. Therefore, ensure that you try all these solutions when you encounter unable to connect to NVIDIA.
One of these solutions is bound to work for you, but if non of these work for you, you can take your issue to an expert PC technician or call NVIDIA to guide you. Good Luck!