I have sometimes been classified as a brand loyalist by some of my peers, especially when it comes to Nvidia. I have used their cards and the software that comes with them in most of my setups.
One of the reasons I have been so loyal to Nvidia is their Geforce Experience software which does its thing mainly in the background and keeps my display drivers up to date for me.
Whenever I install a new game, my first instinct has also been to optimize that game for my hardware using GeForce Experience so I can get the best visuals with stable frame rates.
Being a part-time streamer, I can attest that this tool has served me well for many years and will do so for the foreseeable future.
However, some may consider it more bloatware than a helpful tool, and I will not argue with you on that but instead show you how to uninstall GeForce Experience using three simple methods.
Why Do You Want To Uninstall GeForce Experience?
There can be specific reasons you might not find the Nvidia GeForce experience practical and may want to get rid of it. One of those reasons may be that it is hogging precious system resources like processing power and RAM to do its thing when you need that power somewhere else.
Or maybe you are not satisfied with Nvidia Share, which can cost you almost ten frames per second in some games when software like OBS does not have this issue.
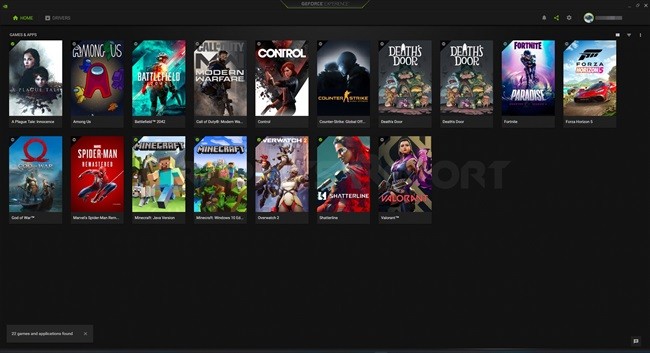
The GeForce Experience can also warrant uninstallation because it needs your data, like Email, to work properly, which is akin more to data mining as there is no need for software to require these to work.
Whatever your reason, you can delete the GeForce Experience simply by following the steps I will mention in the subsequent paragraphs.
Related guides:
- Unable to connect to Nvidia
- The Nvidia control panel not opening
- Geforce experience something went wrong
- The Nvidia control panel missing
- You are not currently using a display attached to an Nvidia GPU
How To Disable NVIDIA GeForce Experience?
The Disabling method is more for people who like the software and want to use it periodically but do not want it to run all the time in the background; instead for those who want to get rid of it completely.
Here is how you disable Nvidia Geforce Experience on startup.
- First thing you are going to select “Task Manager” and open it.
- Once your task manager opens up, navigate to the “Start-Up button and click it.”
- There you will find a menu of programs; scroll down until you find Nvidia GeForce Experience and right-click it, where a menu will pop up. Click on disable, and you are done.
- Now Nvidia GeForce Experience will no longer open automatically on startup, but you can still use it by clicking its Icon in the start menu.
How To Uninstall GeForce Experience
If you are adamant about getting rid of Nvidia GeForce Experience, here are three ways to uninstall it from your Computer.
Method 1- Uninstall GeForce Experience Through Control Panel
First, you will go to the Start Menu in Windows 10 and Click on the settings Icon, which is right above the power button.
Once the settings application has opened up, you will find “Apps,” which should be the first option in the second column, and click on it.
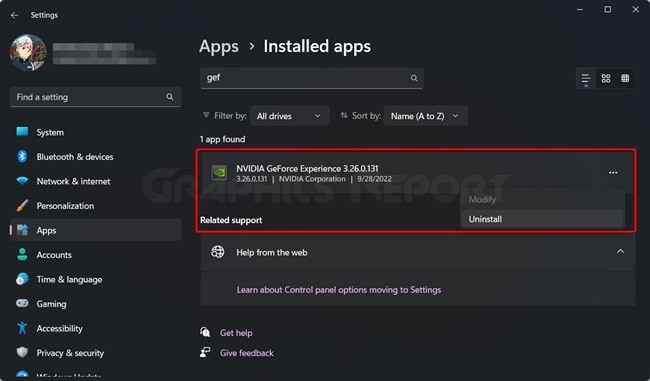
You will see a list of all the applications you have installed on your Computer. Scroll down until you find GeForce Experience, or search for it by typing “Geforce experience” in the search bar.
Once you have found it, click on it, and there you should see two options in front of you, “Modify” and “Uninstall.” Click on Uninstall. Let the wizard run for a bit, and you should be done.
Method 2- Uninstall GeForce Experience Via System Restore
The following method for uninstalling GeForce Experience is a little drastic and should be used if your Computer misbehaves after installing the software.
First, go to “My Computer” Or “This PC” and open it. Right, Click on the window and select “Properties” in the pop-up menu.
On the right of the properties menu, you will find “System Protection,” which you will click to open the “System Properties.”
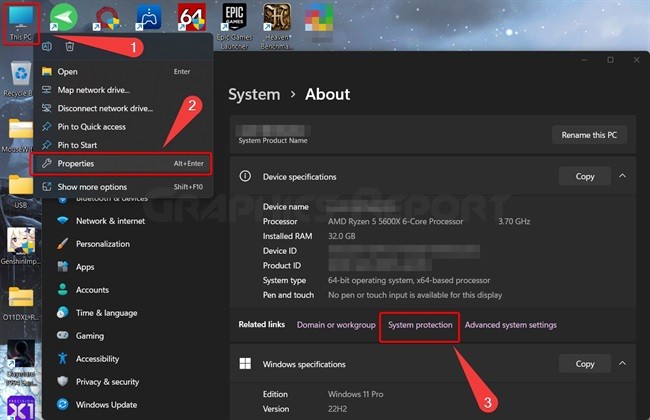
Click on “System Protection.” You will see a “System Restore” option which you will click. In the “System Restore,” you will click on “Choose a different restore point” and click on next.
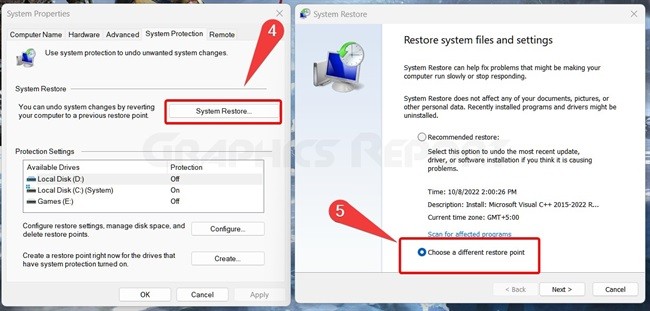
Select a date before you have installed GeForce Experience and click on next. The Computer will reboot and revert to when the software was not installed.
Method 3- Uninstall Geforce Experience In The Installation Directory
The last method I will tell you is to uninstall the GeForce experience through the installation directory. All you have to do is go to the directory where your operating system is installed.
Click on “Program Files.” Next up, scroll down and go to “Nvidia Corporation.” Click on Nvidia GeForce Experience. Click on the Icon, which is labeled as “uninstall.”
Let the wizard run for a bit, and you should be done. Delete the folder once the uninstall has been completed.
Clear Temporary Files To Eliminate Residue From GeForce Experience
Once you are done with using any of the three methods to uninstall GeForce Experience, you will clear any residue left by the program.
First, you will press “window+R” on your keyboard or search for the Run app on your Computer directly. Once the run has opened up, write “%temp%” in the bar and run it.
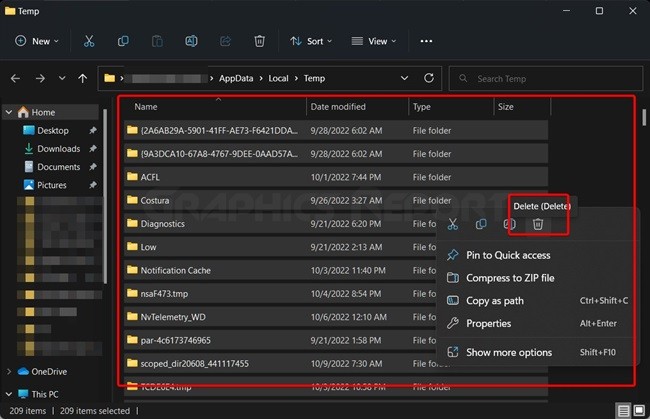
A window will pop up with all your Computer’s temporary files. Select them all and delete them in one swoop. This should clear any residue left by the GeForce Experience.
My Final Thoughts On It!
Well, this sums up my guide on how to Uninstall Nvidia GeForce Experience. This application is undoubtedly helpful if you cannot update your drivers manually. Still, if you do not like it and think it is hogging your system resources, then it is better to uninstall it.
I have explained three methods that can be useful for uninstalling this application; however; method number 1 is by far the easiest and most effective method; however, if you run into some issues while uninstalling it, methods two and three are there for you.

