My work involves me having to build, test, and review different computers constantly. Since I work on so many other computers, it is hard for me to remember the specifications of each PC, and I often find myself asking what graphics card this PC has.
I wanted to find ways to find out what graphics card I have without being dependent on my team to tell me this. I researched and found a few ways to check what graphics card I have.
I’m pretty sure many of you people have asked yourself the same question quite a few times. Well, don’t you worry, guys, I have got your back. Today, I will be telling you some ways you can check what GPU you have installed on your PC without spending hours disassembling it.
Stay with me till the end of this blog to find out what these ways are.
7 Solutions To Find Out Which Graphics Card You Have In Your PC?
Now I’ll be telling you seven ways you can use to check what graphics you have on your computer. So without wasting any more time, let’s start exploring these ways.
#1- Through System Information
The first method is to check what GPU you have using system information. It is one of the simplest and quickest methods for testing your graphics card. A friend who is much of a techie taught me this, and I’m excited to share it with you.
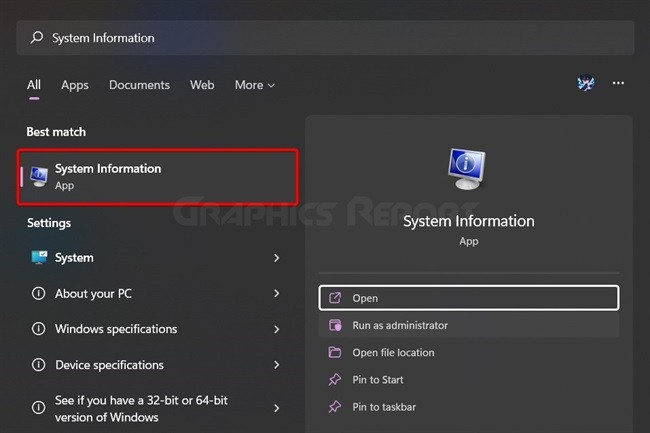
System Information is an application on Windows that does not need to be installed. This provides detailed information about your computer. Systems information can teach you everything from RAM to GPUs. (For obvious reasons, this is the application that I mostly use .)
- Enter “system information” into the Start menu.
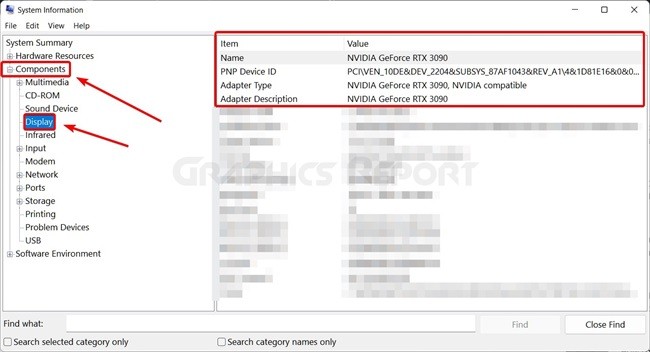
- When it appears, click the + sign next to components.
- Finally, on the expanded list, click display.
- Voila! You’ll see the name, type, and device ID of your graphics card.
#2- How To Check What GPU You Have Through Directx Diagnostic Tool?
The second method is by using DirectX Diagnostic Tool. This is one of my favorite tools. This not only tells me the name and model of the GPU, but it also tells me if it has any problems. And it’s the simplest to use!
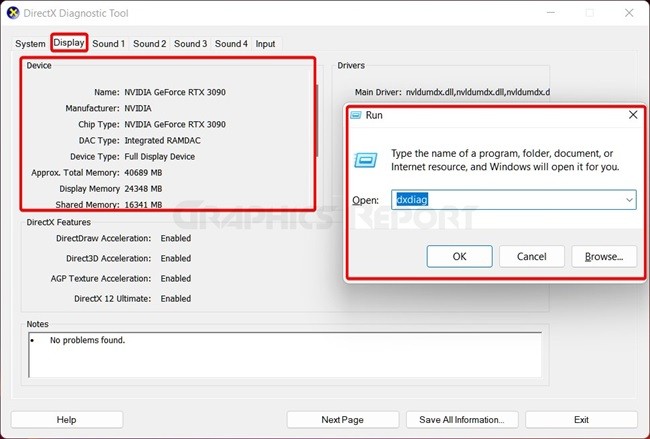
To run this command, simply type “dxdiag” and press enter. The “display” option is available here. When you click on this, you will see all of your GPU’s specifications. If there are any problems with the GPU, they will be displayed in a small box at the bottom of the page.
#3- Through Display Settings
The method that I will be telling you about today involves using your display settings to find out what graphics card you have. This method is much easier and more accurate for determining which GPU is installed in your system.
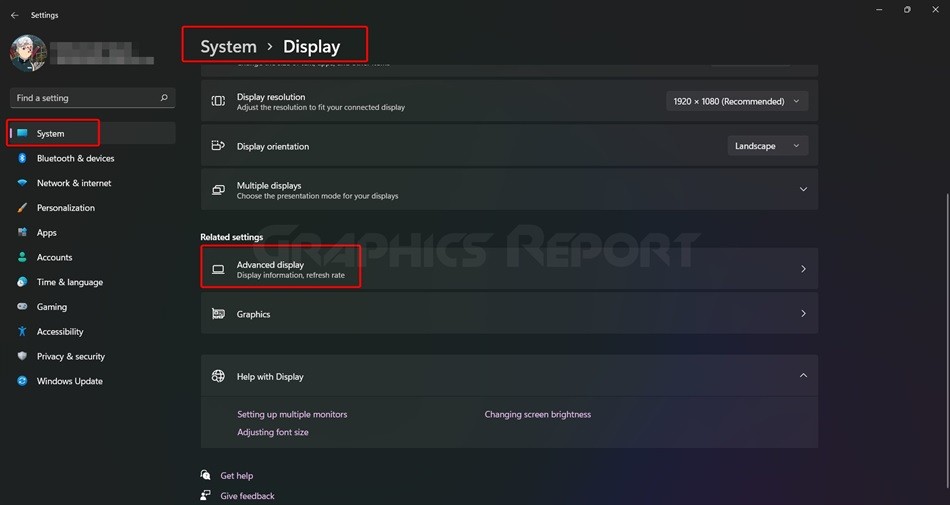
The first thing that you need to do is to open your start menu by searching for “settings.” You’ll see the word “systems” there. Open it by clicking on it. “display” can be found here.
Choose this, then click “advanced display settings.” There is display information there, as well as information about which graphic card is installed in the system.
#4- How To Check What GPU You Have In Task Manager?
The Windows Task Manager is another way to find out what graphics card you have. This provides a very detailed response to our question. Other than answering the question of what graphics card we have, this also provides insight into how well the GPU is performing.
Let me show you how to get to your task manager.
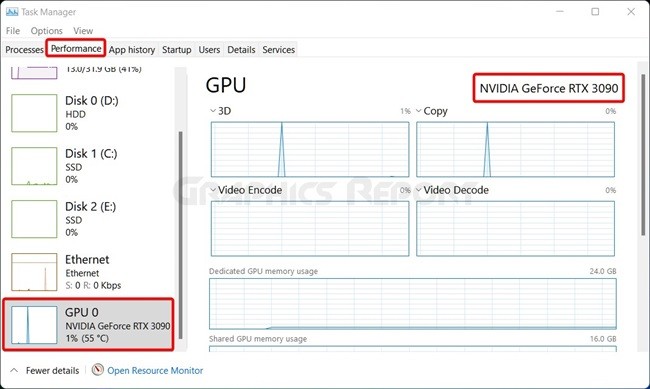
Simply press CTRL+ALT+DELETE, and select Task Manager from the list that appears, now click on the Performance tab, and select GPU from the list.
This will tell me which graphics card I have on my computer, as well as my GPU utilization and temperature.
#5- How To Check Your Graphics Card By Opening Your PC?
Another method is something that most of you already know. I personally believe that this is one of the most difficult methods for determining which graphics card is installed on your computer.
The first step is to remove the casing from your computer or laptop. The next step is to find your GPU., which is typically located near your CPU on your motherboard.
You will not be able to detach an integrated GPU. If it’s a dedicated GPU, however, you can simply remove it from its slot. The manufacturer’s and model’s names are written on the GPU.
#6- How To Find Out Graphics Card Details Using The Control Panel?
Now, this is a much simpler method. I personally prefer using this method when I am in a hurry or not in the mood to use some lengthy method to find out which graphics card I have on my computer.
All you have to do is type “Control Panel” into your start menu search bar. When the control panel option appears, click on it. Then, from the options that appear, select Hardware and Sound.
Here you will be able to see the option for the graphics card that is installed in your system. If you have NVIDIA display drivers installed, you can access the NVIDIA control panel to inspect and configure the system.
#7- How to Check What Graphics Card You Have with PowerShell?
The seventh method of checking what graphics card you have on your computer is by using PowerShell. This method is one that most people do not know about. But this gives the most comprehensive information about your graphics card.
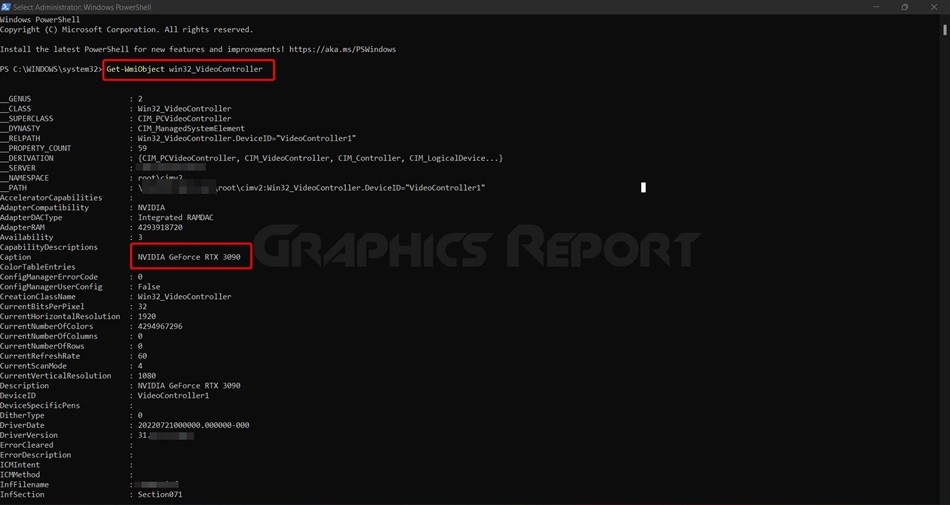
Click “Windows PowerShell (Admin)” after pressing “Windows + X.” Use the following commands to determine the type of graphics card you have: If you want to see all of the information Windows has on your laptop or PC GPU, type Get-WmiObject win32_VideoController for a complete list of properties.
My Final Thoughts On It!
So there you go, guys. These are some methods that I personally use to see what graphics I have installed on my computer. There are many other methods that can be used to see what graphics card you have on your computer, but I personally find them very lengthy and time-consuming.
I hope everything that I told you guys today comes in handy at some point in your life, and you can save some time and hard work by simply following this guide.
Related guides:
How to uninstall GeForce experience
Should I upgrade CPU or GPU first
Does graphics card affect fps
Optimal gpu temperature


